Search

Search

This section doesn’t currently include any content. Add content to this section using the sidebar.

Image caption appears here

Add your deal, information or promotional text

Daily Plan Bar

This past year I’ve started using a modified form of the Bullet Journal approach, using a dot grid notebook, thanks to a gift of an official Bullet Journal Notebook from creator, Ryder Carroll.
As many do, I’ve made a few modifications to the standard approach—one was switching to square checkboxes, and the other: The Daily Plan Bar. After using and tweaking The Daily Plan Bar idea for almost a year, It seemed time to document it and share the idea in more detail.

What is the Daily Plan Bar?

The idea is simple—and credit where credit is due—it was inspired by my friend, Bill Westerman way back in 2006.

Building the Daily Plan Bar

First of all, I like keeping things simple. I prefer dot grid notebooks, like a Leuchtturm1917 A5, or a Baron Fig Confidant, because the lighter grid offers a structure, yet doesn’t overpower the page like a squared page can. Still, squared pages work well too. My pens of choice lately are good old Papermate Flair felt-tipped pens in black and colors, though I use all sorts of other gel pens too.
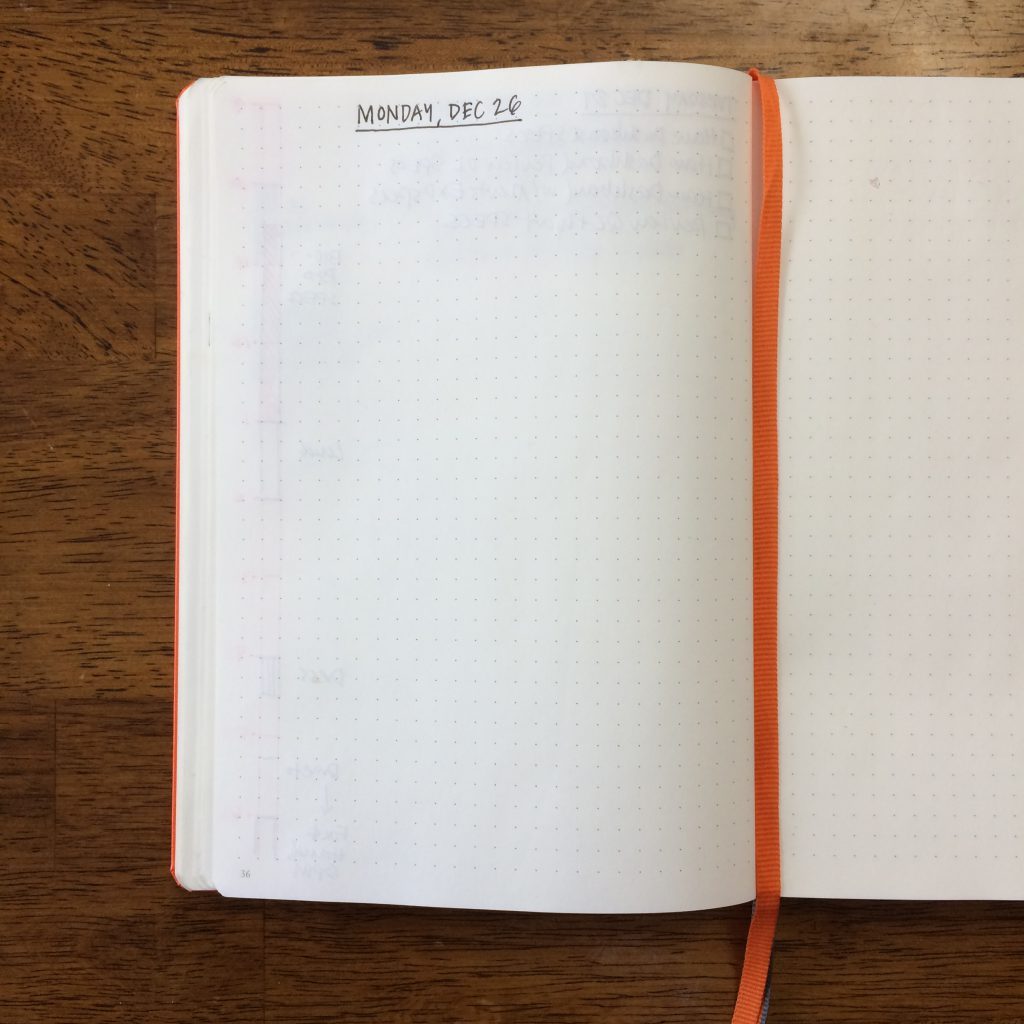
Step 1: Begin by writing the day’s the date at the top of the page. Step 2: Leave one vertical grid of space from the edge of the page, then draw two vertical parallel lines starting at the top of the grid, right to the bottom of the grid, vertically. Straight edges come in handy for this. Left page: the bar is on the left (I use a bright orange or other bright color flair marker to contrast to the black used for the details.): Right page: the bar is on the right: Create the bar on the right side of the page, for right-hand pages.
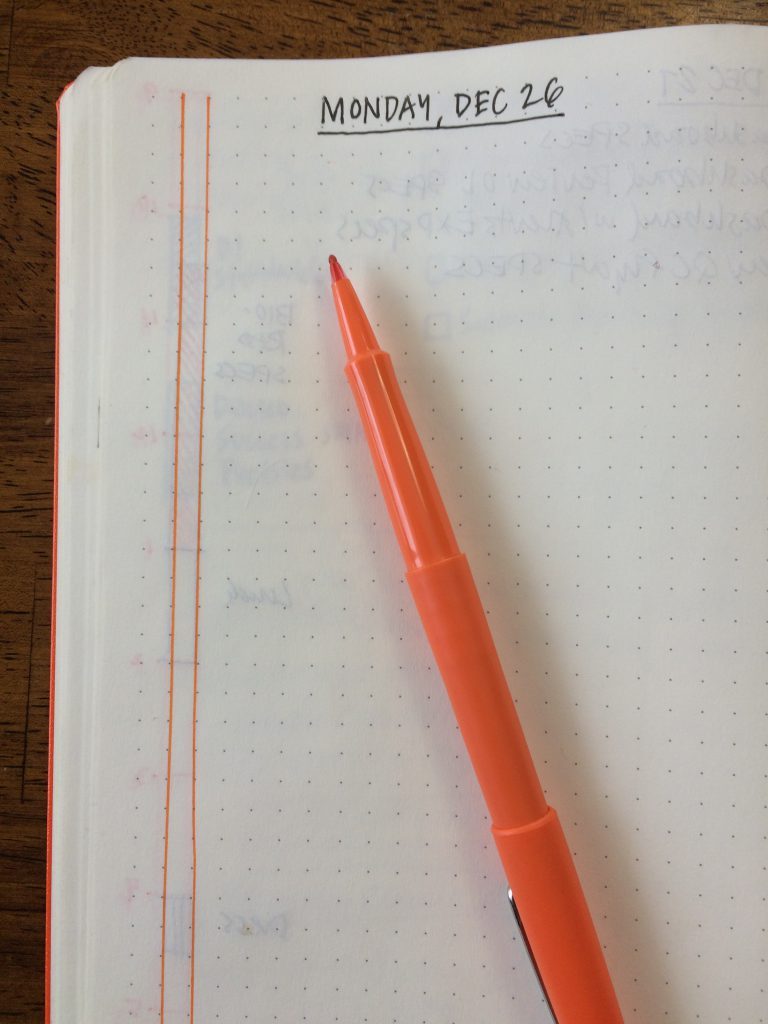
Step 3: Create hour blocks with the vertical bar by closing off the top of the two vertical lines with a horizontal mark, adding horizontal marks down the vertical bar every 4th grid measure, like this: Count off 4 grid, then create a horizontal line, to represent an hour of time. Step 4: Add hours on the left edge of the vertical bars. In addition to identifying one hour increments, the dot grid rows allow you to break each hour chunk into 15 minute increments. The margin to the left (or right) of the Plan Bar provides space for the hour indicators. Step 5: Map out your day, using different hatch patterns and/or colors to identify the blocks of time. Here’s a block of time marked with an angled hatch and label.Blocking out time for design or other creative work, instead of leaving these as open space, encourages me to protect and fight for my focused work time. You can just use the squares needed to represent time. Email is a 30 minute time block. For meetings I’ll include people’s names, locations, room numbers, phone numbers — whatever helps me define the time block. As the day unfolds, I’m not afraid to reshuffle — and if that can’t be done within the bar, I add a new section to the right or left of the bar with the updated changes. Doing this helps me see changes more clearly. Adding a 30 minute impromptu co-piloting design meeting to my plan. If a meeting gets cancelled, I simply X it out and leave a note.This is how I cancel and annotate a cancelled meeting. Step 6: Below the date on the top left or right, I use traditional task list, placing the most important tasks at the top with stars next to them. If a more important task is added later on in the day, I’ll use a star to the left of that task for emphasis. Stars help me see the most important tasks for the day. Step 7: The remainder of the page is free for notes, drawings, sketchnotes, or whatever I might need to think through during the day. Often I will log decisions I make as they happen, so I can scan back in my book later on. A completed page, featuring the Daily Plan Bar, tasks, notes and an explanatory sketchnote of a Moka Pot.The beauty of the system is that it’s simple, and I like the morning ritual of laying my day out. I appreciate how this analog approach frees me from constantly looking at my calendar on my Mac, or on my phone.
I place my notebook on my desk, so it’s easy to scan. Using an analog tool like the Daily Plan Bar and a simple task list helps me focus on my planned activities and tasks, while my email and calendar apps stay off.
Additionally, I have a daily record I can scan back through to see where tasks were started and completed, where changes were made, or to find ideas or thoughts about a project. I’ve been using this system since March 2016, and have found it a worthwhile practice. I hope it inspires and helps you too.

The Daily Plan Bar

This past year I’ve started using a modified form of the Bullet Journal approach, using a dot grid notebook, thanks to a gift of an official Bullet Journal Notebook from creator, Ryder Carroll.

As many do, I’ve made a few modifications to the standard approach—one was switching to square checkboxes, and the other: The Daily Plan Bar. After using and tweaking The Daily Plan Bar idea for almost a year, It seemed time to document it and share the idea in more detail.

What is the Daily Plan Bar?

The idea is simple—and credit where credit is due—it was inspired by my friend, Bill Westerman way back in 2006.

Building the Daily Plan Bar

First of all, I like keeping things simple.

I prefer dot grid notebooks, like a Leuchtturm1917 A5, or a Baron Fig Confidant, because the lighter grid offers a structure, yet doesn’t overpower the page like a squared page can. Still, squared pages work well too.

My pens of choice lately are good old Papermate Flair felt-tipped pens in black and colors, though I use all sorts of other gel pens too.

Step 1: Begin by writing the day’s the date at the top of the page.


Step 2: Leave one vertical grid of space from the edge of the page, then draw two vertical parallel lines starting at the top of the grid, right to the bottom of the grid, vertically. Straight edges come in handy for this.


Left page: the bar is on the left (I use a bright orange or other bright color flair marker to contrast to the black used for the details.):

Right page: the bar is on the right:

Create the bar on the right side of the page, for right-hand pages.


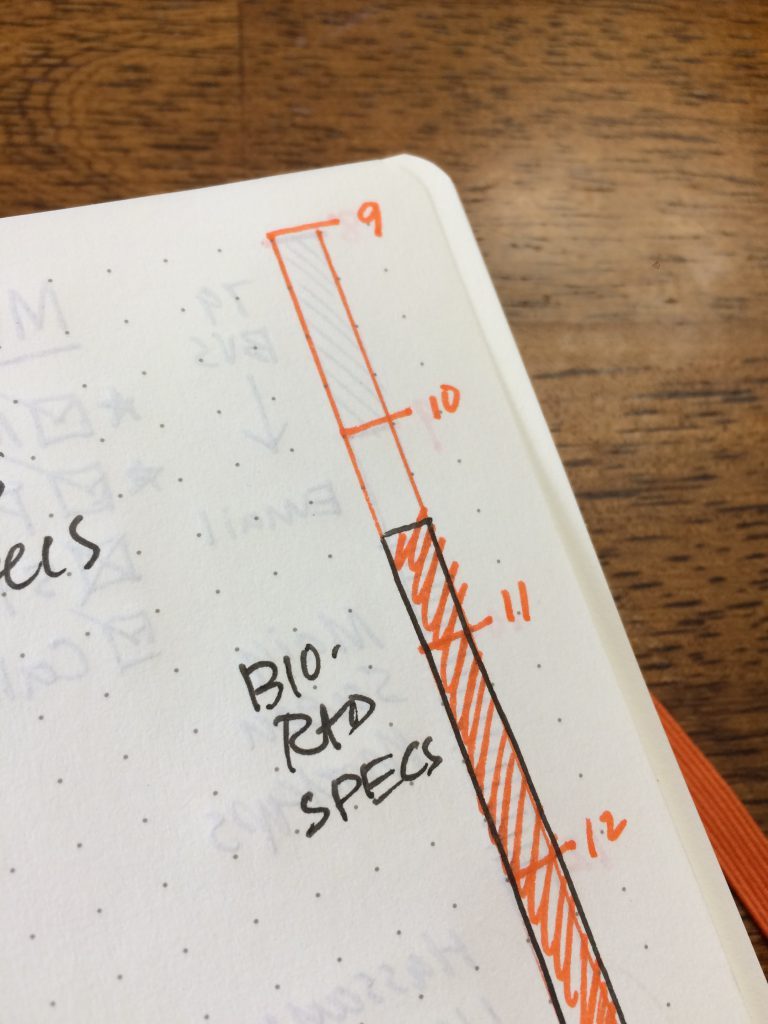
Step 3: Create hour blocks with the vertical bar by closing off the top of the two vertical lines with a horizontal mark, adding horizontal marks down the vertical bar every 4th grid measure, like this:


Count off 4 grid, then create a horizontal line, to represent an hour of time.


Step 4: Add hours on the left edge of the vertical bars. In addition to identifying one hour increments, the dot grid rows allow you to break each hour chunk into 15 minute increments. The margin to the left (or right) of the Plan Bar provides space for the hour indicators.


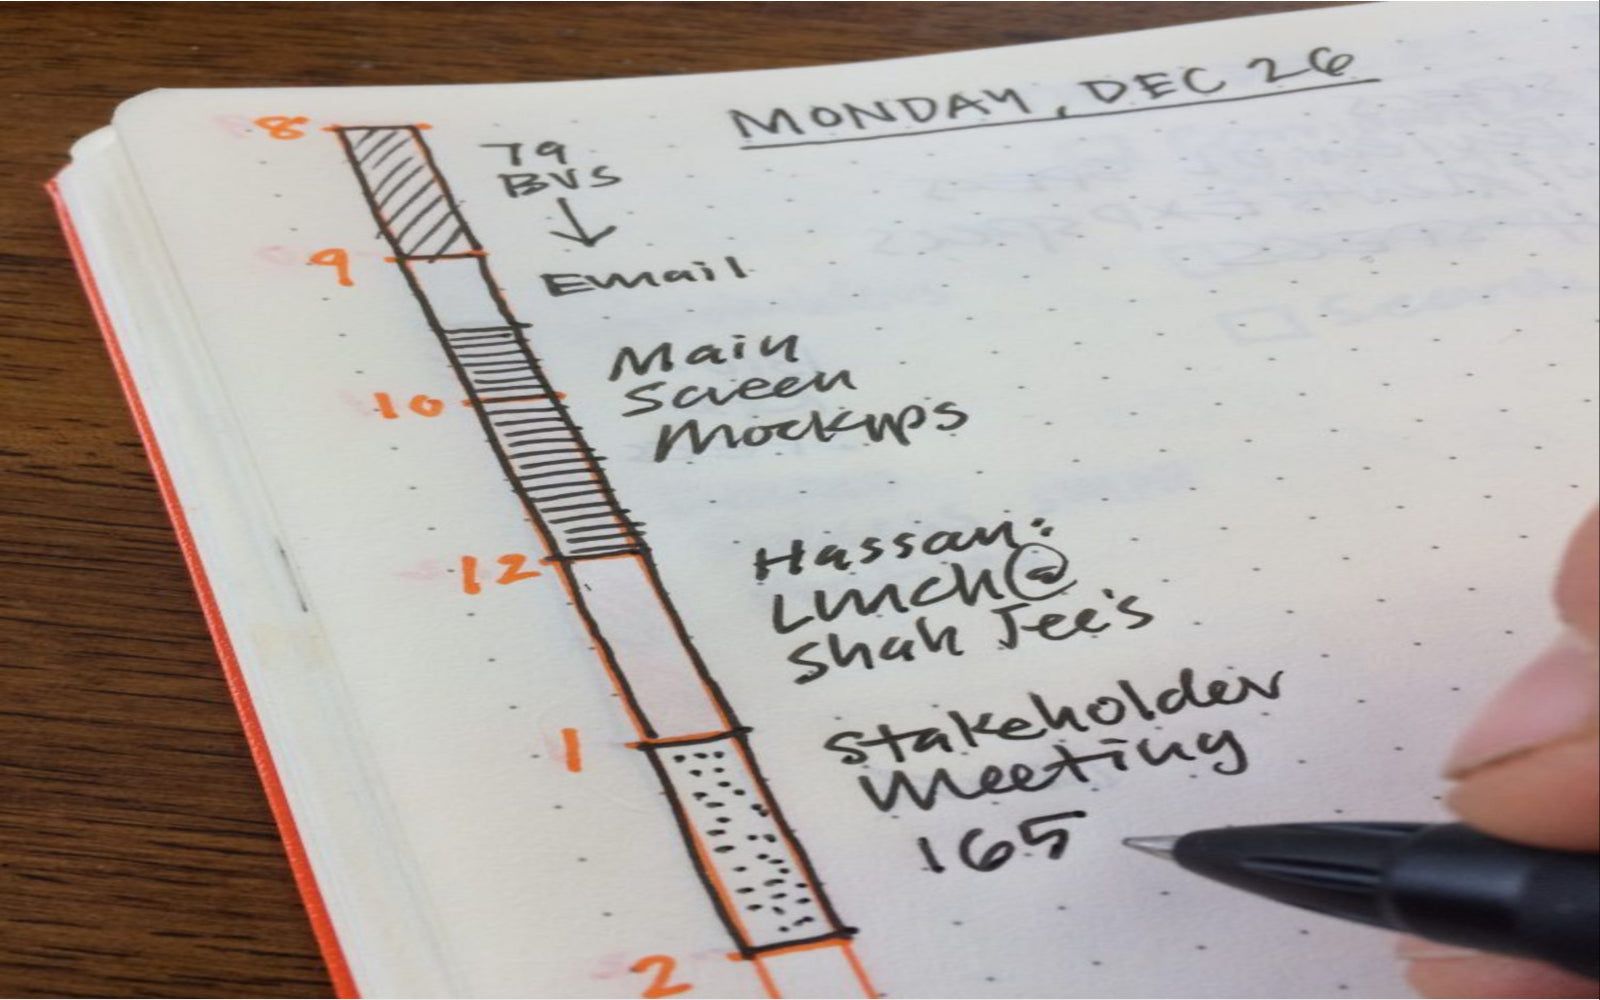
Step 5: Map out your day, using different hatch patterns and/or colors to identify the blocks of time. Here’s a block of time marked with an angled hatch and label.
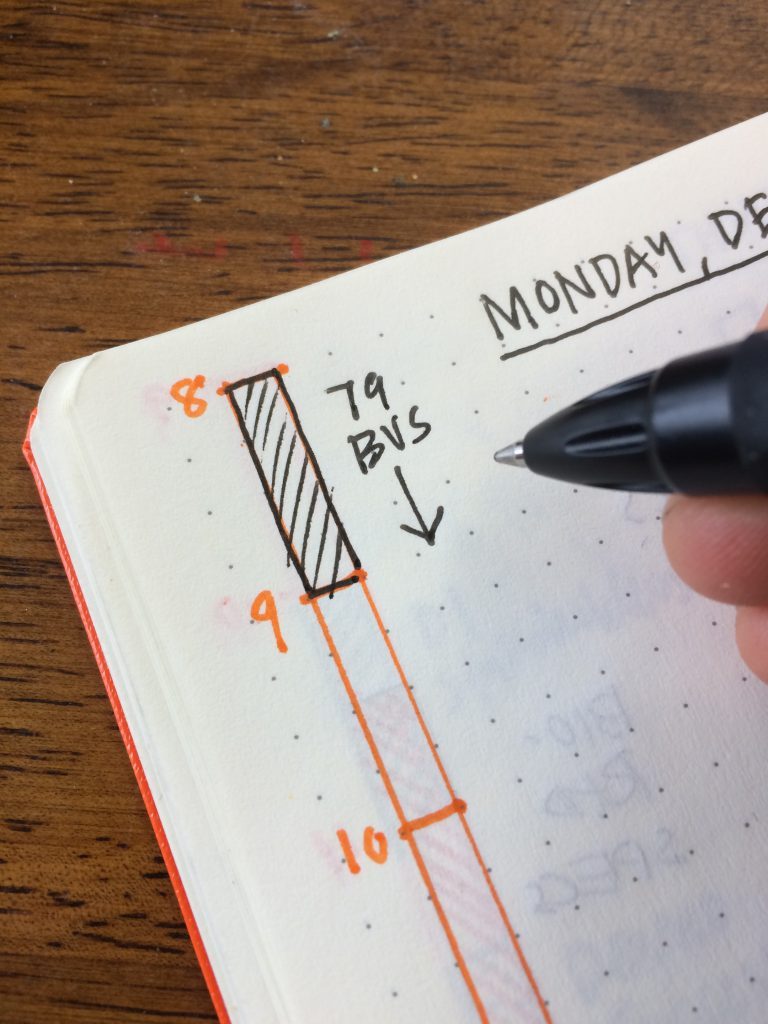


Blocking out time for design or other creative work, instead of leaving these as open space, encourages me to protect and fight for my focused work time.

You can just use the squares needed to represent time. Email is a 30 minute time block. For meetings I’ll include people’s names, locations, room numbers, phone numbers — whatever helps me define the time block.


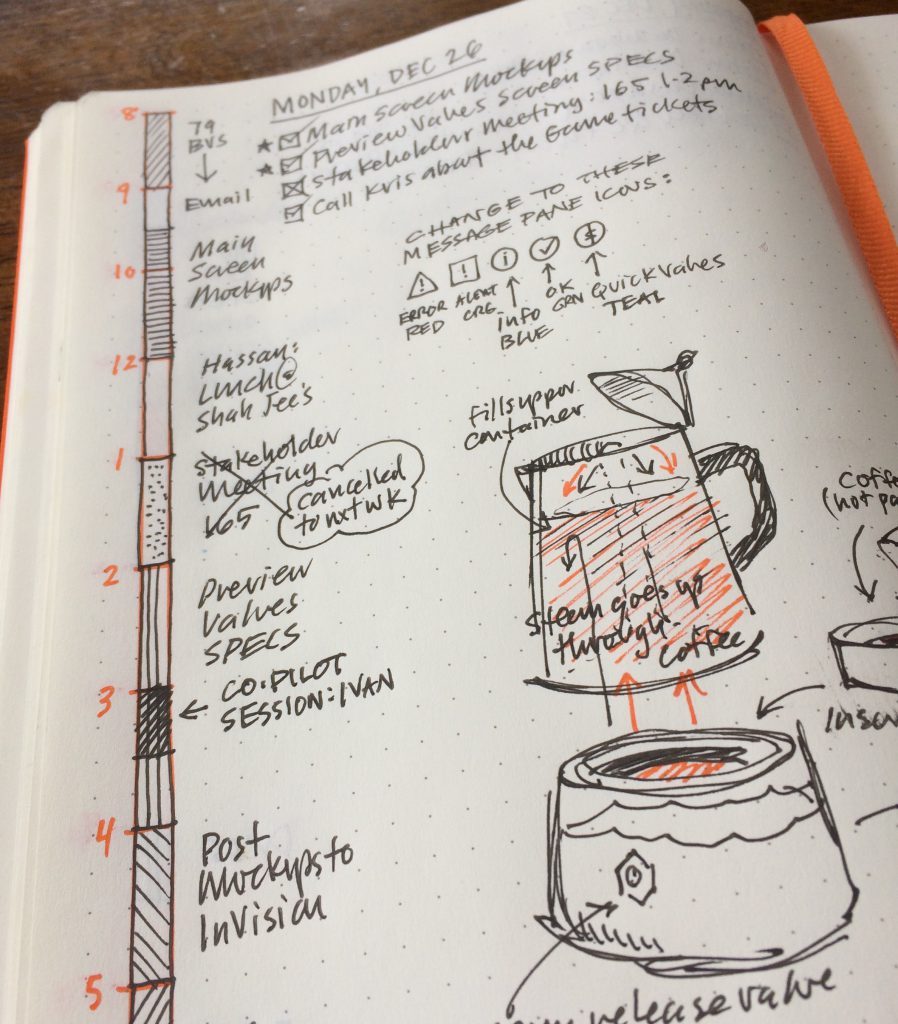
As the day unfolds, I’m not afraid to reshuffle — and if that can’t be done within the bar, I add a new section to the right or left of the bar with the updated changes. Doing this helps me see changes more clearly.
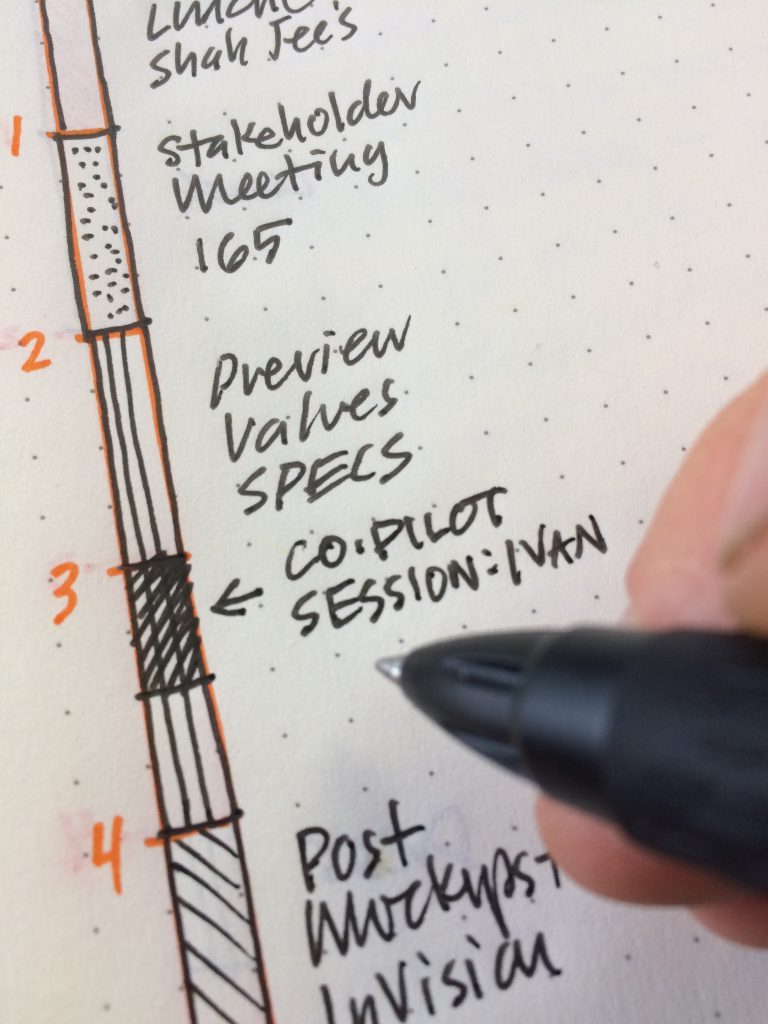
 

Adding a 30 minute impromptu co-piloting design meeting to my plan.


If a meeting gets cancelled, I simply X it out and leave a note.This is how I cancel and annotate a cancelled meeting.


Step 6: Below the date on the top left or right, I use traditional task list, placing the most important tasks at the top with stars next to them.

If a more important task is added later on in the day, I’ll use a star to the left of that task for emphasis. Stars help me see the most important tasks for the day.


Step 7: The remainder of the page is free for notes, drawings, sketchnotes, or whatever I might need to think through during the day. Often I will log decisions I make as they happen, so I can scan back in my book later on. A completed page, featuring the Daily Plan Bar, tasks, notes and an explanatory sketchnote of a Moka Pot.
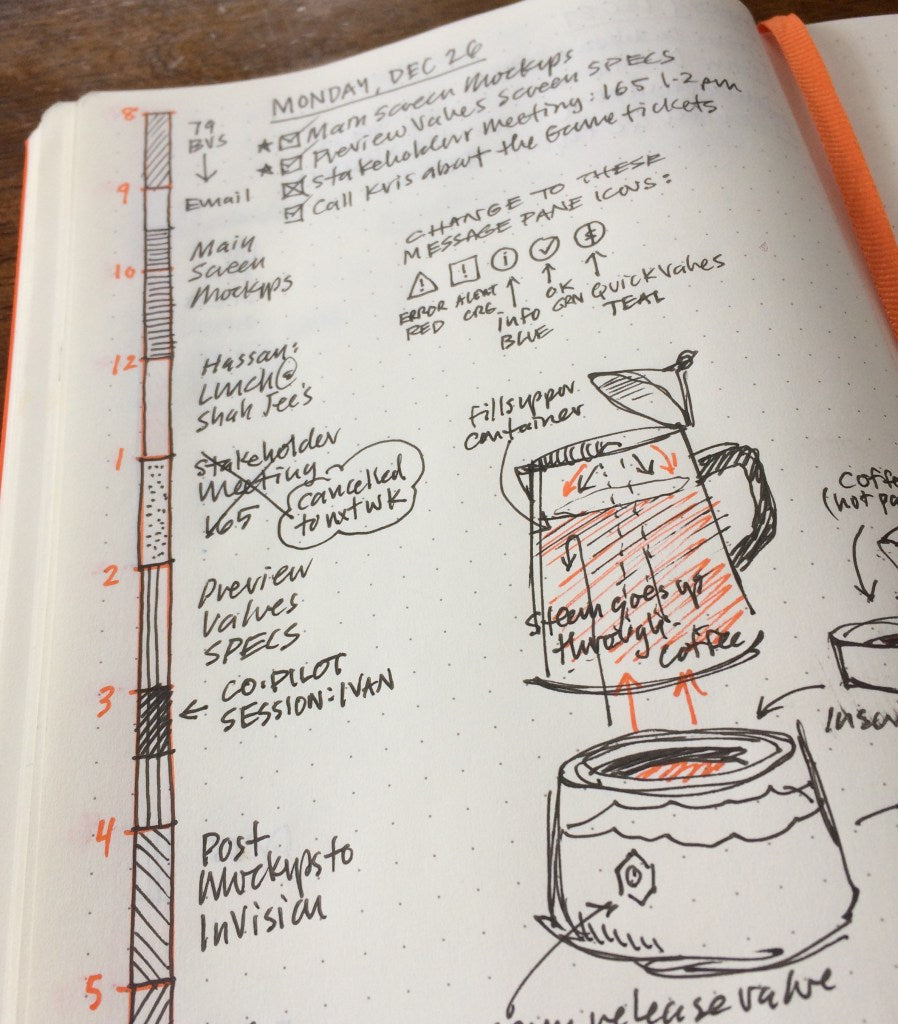
The beauty of the system is that it’s simple, and I like the morning ritual of laying my day out. I appreciate how this analog approach frees me from constantly looking at my calendar on my Mac, or on my phone.

I place my notebook on my desk, so it’s easy to scan. Using an analog tool like the Daily Plan Bar and a simple task list helps me focus on my planned activities and tasks, while my email and calendar apps stay off.

Additionally, I have a daily record I can scan back through to see where tasks were started and completed, where changes were made, or to find ideas or thoughts about a project.


I’ve been using this system since March 2016, and have found it a worthwhile practice. I hope it inspires and helps you too.

About the Author:

Mike Rohde

I’m the author of two bestselling books: The Sketchnote Handbook and The Sketchnote Workbook, which teach you how to create sketchnotes, especially if you can’t draw. Sign up for my monthly email newsletter of visual thinking, The Rohdesign Dispatch.
 

33 Responses

Deb

Deb

April 08, 2024

I know this is super dumb, but I’ve been using bullet journals for everything BUT my daily planner for the last few years. Another journaling site proposed the idea (https://youcanjournal.com/bullet-journal-planner/ if you’re interested) and I wanted to go straight to the source for inspiration. Ya’ll did NOT disappoint! Thanks SO much for these ideas and step-by-step guidance!!

n/c

n/c

January 15, 2024

Notice: We are not liable for any economic loss, data loss, decline in SEO rankings, overlooked patrons, undeliverable email or any other detriments that you may suffer upon the expiration of bulletjournal.com. For more info please consult section 10.a.1a of our Terms and Conditions.
This is your last warning to extend bulletjournal.com:
https://connectnic.com/renew/QlVMTEVUSk9VUk5BTC5DT00
In the event that bulletjournal.com ceases, we maintain the right to offer your spot to rival businesses in the equivalent industry and region after 3 business days on an sale basis.
This serves as the final communication that we are legally required to send out concerning the termination of bulletjournal.com
Safe Online Payment:
https://connectnic.com/renew/QlVMTEVUSk9VUk5BTC5DT00
All functions will be automatically reinstated on bulletjournal.com if payment is obtained in full ahead of expiry. We appreciate your immediate attention to this.

rohdesign

rohdesign

May 15, 2017

Ryder, thanks so much for the opportunity to share this practice with fellow Bullet Journalers. I hope it’s as helpful to others as it has been for me.

EvilSteveDallas

EvilSteveDallas

May 15, 2017

I really love this. I’ve been using the Hope Method for Future Logging (Calendex), but I hadn’t seen a great way to map out a daily timeline until this. Maybe I missed it, but it looks like you allocate one page to each day….is that the case? If so, how far in advance to you write in your daily log and do you burn throught many bullet journals?

fillionsgal

fillionsgal

May 15, 2017

I’m about to start my first ever Bullet Journal and have been researching TONS of ideas on daily/monthly setups. This daily plan bar makes total sense to me. Thanks for sharing!

rohdesign

rohdesign

May 15, 2017

Happy to share!

rohdesign

rohdesign

May 15, 2017

I do allocate one page per day. I should also note I only do the bar at work, but I could see it used for a whole day – though you might need to scale the blocks to fit waking to sleeping hours.

I do it each morning, one day at a time. But sometimes doing a day or two ahead with either a blank bar, or a bar with scheduled times in place.

Seems in a standard Leuchtturm notebook I go about 9 months this way, but that’s
OK for me.

Valerie

Valerie

May 15, 2017

This is fantastic, I’m going to need to be able to track project utilization down to 10ths of an hour and the bar creates a really easy way to do that. Thanks for sharing!

Charles Tsai

Charles Tsai

May 15, 2017

Do you make adjustments to the daily bar to show how the day really played out? Or do you just let it show how you hoped it would turn out?

Jackie

Jackie

May 15, 2017

Do you have any advice on where to find a handy straightedge that will fit in my journal with minimal hangover?

yousillyllama

yousillyllama

May 15, 2017

https://www.amazon.com/gp/product/B0015ZY25I/ref=ox_sc_act_title_2?ie=UTF8&psc=1&smid=A1UEW3GW612BDQ

yousillyllama

yousillyllama

May 15, 2017

This is great. Nice and clean. I am in engineering consulting and keep track of my time to the 1/4 hour. I’ve tried other time tracking methods before but I think I’ll give this a go. It will be more of a time tracker than time planner. Mostly I’ve been using a geometric hour glass as a marker to write my time and just write the time range (i.e. 11:30-12:15). This method may help fill in the gaps when I forget to write things down. I like the visual nature of it. Thanks for the post.

Jackie

Jackie

May 15, 2017

Thank you so much. Now I will be able to have a much cleaner looking journal!

Søren Mørch

Søren Mørch

May 15, 2017

I use a client/credit card, which I carry with me anyway
http://barrymorris.net/the-starbucks-card-mod-for-bullet-journal/

pam

pam

May 15, 2017

How do you handle future meetings? Or do you just block out what is scheduled each day?

rohdesign

rohdesign

May 15, 2017

Pam, I mainly use this for just 1 day, though sometimes I might draw out bars for a week at a time. For longer term planning I use the Week and Month views from the standard Bullet Journal approach.

rohdesign

rohdesign

May 15, 2017

Happy to share. One drawback is that the page is only so tall in an A5 book, so it kind of limits me to an 8-5 workday, though that’s my typical day. You could use only 2 squares per hour for a full day, I think.

rohdesign

rohdesign

May 15, 2017

Charles, if something changes I mark it, but I imagine a good follow-up review practice would be to actually correct each item as the day unfolds, so I can reference each day and see an accurate picture of what I actually did.

rohdesign

rohdesign

May 15, 2017

Hopefully your pages are tall enough to fit 10ths of an hour tracking – I go to quarters of an hour as my minimum!

Tyra Evans

Tyra Evans

May 15, 2017

I imagine you could just add a second column on the inside of this one, if your day goes as planned you can transfer each bar across at the end of the day but you could fill in changes as you go? This would also help if you find yourself wasting chunks of time when you should be doing something else!

yousillyllama

yousillyllama

May 15, 2017

I’m okay with that. I can fit 7:30 through 5:15 in the A5 L1917 which is enough for me. Any night meeting i can just jot down next to 5 and write a range. That’s the beauty of bujo.

Tricia Halloran

Tricia Halloran

May 15, 2017

Lovely and so helpful, I’m going to try it! I noticed you left out 11a, was that b/c you planned to block the morning anyway and that gave you room for an extra hour at the end?

João Carlos M. Jr

João Carlos M. Jr

May 15, 2017

This is really great. I am trying this and for me it is the best layout possible. I am having just two problems: I use a Pocket (A5) moleskine, so it is small to all my active hours, and sometimes I put two days in a single page, using this rule I can’t fit that. I am figuring out how to solve these small issues. If I figure out how to make this work, I am going to post here again.

And thank you for sharing your layout.

Najoni

Najoni

May 15, 2017

Why not use left hand page for first 12 hours of day and other page for the remaining 12 hours of the 24 hour day if needed

yousillyllama

yousillyllama

May 15, 2017

Sure you could do that. I don’t have a need to track or schedule 24 or even 12 hours of my day.

Eric Beaty

Eric Beaty

May 15, 2017

Some great ideas here for sure. Nice and clean, with plenty of room for spur of the moment insights. Definitely a compliment to an already minimalistic system.

Moira Dunne

Moira Dunne

May 15, 2017

Totally inspired Mike. Thanks so much for sharing your ideas. Like so many others, I have been doing so much of this in a chaotic way on paper scraps for years. Txs to Dylan’s genius and your tips I can now pull it all together into something productive.

Nicki Hambleton

Nicki Hambleton

May 15, 2017

I’m just about to start my first bullet journal and waiting eagerly for it to arrive in the post. I have struggled with digital, phone and paper organisation for years and never found one that works. I have multiple sketchbooks and apps on my phone and I am hoping this will finally be the method to adopt. It sounds ideal and this certainly helps kickstart me, especially from the guy who started me sketchnoting! Thank you so much Mike and Ryder for sharing – any initial advice for me?

Joseph Dickson

Joseph Dickson

May 15, 2017

https://uploads.disquscdn.com/images/88ea3c9e7de8f390747d44ad7d71413582fa05726b9c4b273c879f41721a5bfe.jpg

I have tried this on a Field Notes pocket notebook. Generally a spread a day. But it doesn’t leave much space for anything else.

https://uploads.disquscdn.com/images/540385b59f1b25afa8d4c0a2ffc14d0afc0ea4253f1d45fd1884cafbcd43fbe1.jpg

To save space consider a horizontal timeline and 1 or 2 hour blocks.
You can then create simple signifiers if needed for the list below.

trulysorry

trulysorry

May 15, 2017

I love the vertical time tracker on the edge of the sheet. I am trying this if you don’t mind:)

Minimalist_Bohemian

Minimalist_Bohemian

May 15, 2017

Fantastic concept! definitely going to be trying this out in March.

sandark

sandark

May 15, 2017

Thanks for this, I was looking for something with a semblance of timeline, i felt other timelines had too much line criss-crossing each other indicating tasks and to-dos.

Becca Thresher

Becca Thresher

May 15, 2017

I love this! It’s like you’re in my brain ;D

Leave a comment (all fields required)

Comments will be approved before showing up.